ChatGPTを使ってみたけれど「思った通りの答えが返ってこない」と感じたことはありませんか?
曖昧な指示では冗長な文章になったり、社内レビューで「根拠が薄い」と指摘され、効率化どころか手間が増えてしまう方も少なくありません。
では、どうすれば誰でも安定して正確なアウトプットを引き出せるのでしょうか?
本記事では、以下の通りChatGPTを実務で使いこなすための具体的なコツを紹介します。
- 初心者が押さえるべき基本ステップ
- 質を高めるための「伝え方のコツ」
- 日常・学習・仕事で使える用途別のプロンプト例
- 失敗しやすいパターンと改善方法
- 安全に利用するための注意点
この記事を読み終えたときには、すぐに使える改善手順が揃い、明日から自信を持って業務に取り入れられるはずです。
ChatGPT使い方のコツ【5つの基本】
ChatGPTの使い方のコツは、「最初に考える→短く始める→形式を決める→調整する→検証する」という流れを外さないことにあります。以下の5つを押さえれば、誰でも安定して役立つ出力を得やすくなります。
事前に「何を求めているか」を考える
聞く前に「目的・対象・形式(使い道)・制約」を言語化しておくと、ChatGPTの「回答の命中率」が上がります。これはChatGPTの使い方のコツの中で最も重要です。
生成AIは与えられた文脈に忠実なので、目的が曖昧だと一般論や回り道の説明が増えてしまいます。
| 目的 | ◯◯に掲載する/◯◯の準備 |
| 対象 | 読者は◯◯(年齢/関心/前提知識) |
| 形式 | 箇条書き/見出し構成/表/短文 など |
| 制約 | 専門用語の多用/断定/〜はしない表現 など |
このように「誰のために」「何に使うのか」「どんな形で」「何を避けたいか」まで入れると、初回から外しにくくなります。質問前の少しの時間でいいので、「目的・対象・形式・制約」をひと言ずつ添えるだけで出力の質は大きく変わります。
悪い例:「ブログの構成を作って」
良い例:「旅行ブログの初心者向け記事構成をH2/H3の階層で10見出し、国内一人旅の悩みを解決する流れで。見出しは20文字以内、語尾はです・ます調で」
シンプルな指示から始める
最初は短く、要件を一つだけ伝えましょう。条件を盛り込み過ぎると、優先順位の解釈ズレが起きやすくなります。
まず核となるタスクを確定し、その後に条件を段階的に追加すると誤差が減ります。
例:
1回目:「家計の固定費を減らす見出し案を5つ、20文字以内で」
2回目:「上の5つを初心者向けに調整。重複語を削除し、検索意図が分かる言い換えを」
3回目:「3候補に絞って、各候補の要点を追記」
この流れなら、出力の焦点が徐々に合っていきます。初回は「要件1つ」で試し、次に補足条件を重ねるのが結果的には最短ルートです。
出力形式を指定してブレを防ぐ
形式の指定(フォーマット)は、品質を一気に安定させます。同じ内容でも、箇条書き・表・短文など形式によって読みやすさや比較のしやすさが変わります。
形式を決めれば、余計な装飾や冗長表現が減ります。
例:
- 箇条書き指定:「各項目は1行20〜30字、3項目に」
- 表指定:「2列×5行の表で、左に課題、右に対処。見出しは7字以内」
- 短文指定:「140字以内で結論→理由→一言補足の順に」
- 出力例の明示:「次のサンプルと同じ形式で」
また「禁止事項(例:専門用語の多用・根拠のない断定)」を添えると、解釈の余地が減ります。形式指定と禁止指定をセットで行うことがポイントです。
使いやすいテンプレ
「以下の形式で出力してください。
- 形式:◯◯(箇条書き/表/見出し構成など)
- 長さ:◯◯字以内/◯◯項目
- 口調:です・ます調/やさしい説明
- 禁止:専門語の多用/断定口調/根拠のない主張」
再質問で調整して精度を高める
差分指示で微調整を重ねることが大切です。はじめから完璧を狙うより、一度出力を見て再質問し、訂正を繰り返すほうが速く、正確になります。
例:
- 差分の伝え方:「●と▲の表現が抽象的です。具体例を1つずつ追加してください」
- 優先度の提示:「簡潔さ>網羅性で。各項目は1行に短縮」
- 検収条件の明示:「20文字以内/重複語なし/初心者が理解可能の3条件を満たしてください」
こうした短い再質問の積み重ねが、最終品質を決めます。ChatGPTの使い方のコツは「具体的な差分の要求」です。出力→指摘→再出力の流れを作り、1ラウンドごとに改善点をひとつに絞ると成功率が上がります。
再質問のテンプレ
「上記の結果に対して、以下の差分を反映して再出力してください。
- 修正点:◯◯(例:具体例を1つ追加)
- 優先度:◯◯(例:簡潔さ>網羅性)
- 検収条件:◯◯(例:20文字以内・重複語なし・初心者向け)」
結果を自分なりに検証・活用する
最後は人の目で検証し、用途に合わせて整えることが欠かせません。
ChatGPTは便利ですが、生成結果に事実・表現・倫理の観点でズレが出ることもあります。用途に応じて、整え方や注意点を調整しましょう。
例:
- 事実確認:日付・数値・固有名詞は一次情報(公式ページ・元論文・統計)で照合
- 表現調整:対象読者に合わせて語調・長さ・専門用語を調整
- リスク管理:公開前に根拠の記載と引用表記を整える
ChatGPTをさらに実践的に使いこなすコツは検証で信頼性を確保することです。生成結果を「完成」と捉えず、「素材」として検証・編集することで、安心して活用できます。
生活・学習・仕事で役立つ用途別の指示のコツ
ChatGPTの使い方のコツを理解したら、次は具体的な利用シーンに落とし込むことが大切です。日常生活から学習、仕事まで幅広い場面で役立ちます。
それぞれの用途に合わせて指示の出し方を工夫することで、より実用的で精度の高い回答を引き出せます。
日常生活での活用例(料理・旅行・趣味)
ChatGPTは日常生活のパートナーとしても活躍します。特にレシピや旅行計画、趣味のアドバイスなどは条件を具体的に伝えると実用性が高まります。
日常生活での活用ポイント・指示例
| シーン | 指示の仕方例 |
|---|---|
| 料理 | 「鶏むね肉とブロッコリーで20分以内、2人分のレシピを教えて」 |
| 旅行 | 「東京から2泊3日、予算5万円以内、家族連れ向けの旅行プラン」 |
| 趣味 | 「家庭菜園初心者向けに、簡単なコツを3つ、箇条書きで」 |
条件を具体的に設定すると、一般的な説明ではなく、すぐに使える実用的な回答が得られます。
学習に役立つ使い方(要約・質問・暗記支援)
学習場面では、ChatGPTを「理解の補助ツール」として使うのがおすすめです。要約や質問、暗記支援などに活用することで効率が上がります。
学習での活用のポイント・指示例
| 学習用途 | 指示の仕方例 |
|---|---|
| 要約 | 「この文章を200字以内で、小学生にもわかるように要約してください」 |
| 質問 | 「〇〇の仕組みを、初心者でも理解できる例を交えて解説してください」 |
| 暗記 | 「世界史の重要年号を、クイズ形式で10問作成してください」 |
理解レベルを指定すると、抽象的な説明ではなく、自分に合った粒度の情報を得られます。
仕事で便利な使い方(メール・資料・企画)
仕事の現場では、ChatGPTを「たたき台作り」に活用すると効果的です。メール・資料・企画など幅広く応用できます。
仕事での活用のポイント・指示例
| 業務用途 | 指示の仕方例 |
|---|---|
| メール | 「社外向けの謝罪メールを200字以内で、丁寧な表現で作成してください」 |
| 資料 | 「営業提案用に、製品Aのメリットを3点、短い箇条書きでまとめてください」 |
| 企画 | 「若年層向けの新サービスアイデアを5つ、競合との差別化ポイントを添えて」 |
完成品ではなく素材を作らせ、自分で検証・調整することで精度が高まります。短時間で初稿が完成する点が大きなメリットです。
良い指示と悪い指示の比較で学ぶ
ChatGPTを効果的に使うには「どんな指示を与えるか」が結果を大きく左右します。ここでは、悪い例と良い例を比較しながら、ChatGPTの使い方のコツを具体的に解説します。
実際の指示の差を知ることで、すぐに活用できる改善点が見えてきます。
曖昧な指示と具体的な指示の違い
曖昧な指示では一般的で使いにくい回答になりがちです。具体性を持たせるだけで回答の精度が大きく変わります。
指示例
| 悪い例 | 良い例 |
|---|---|
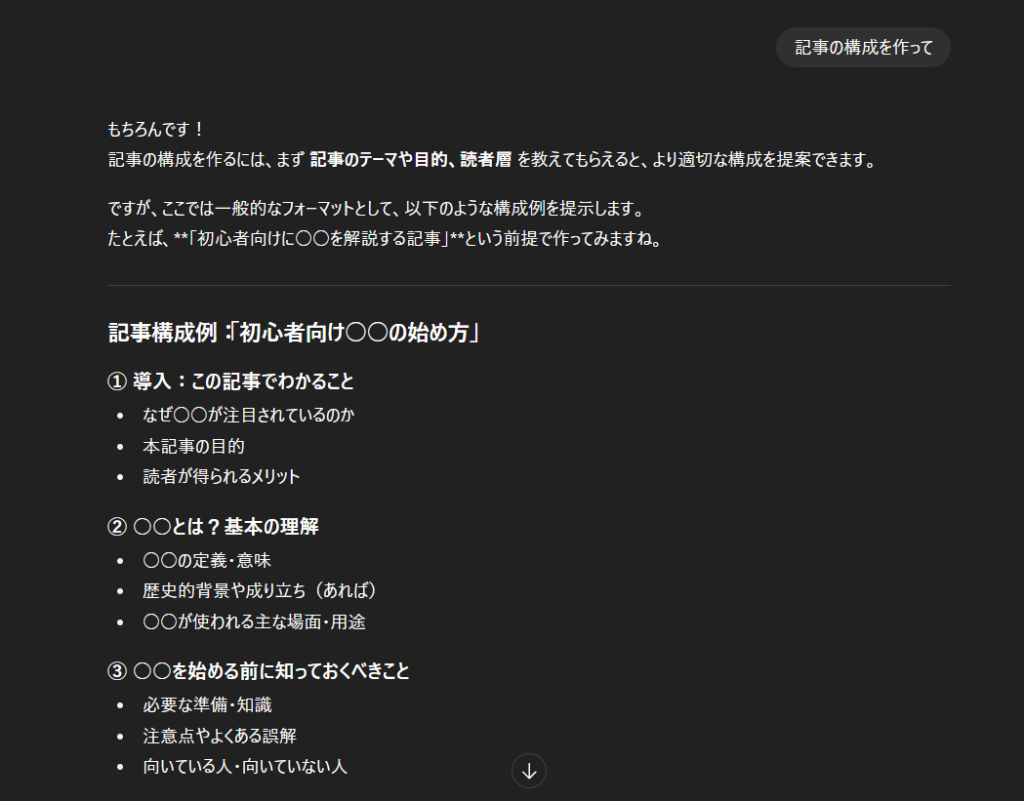
| 「記事の構成を作って」 | 「旅行ブログの記事構成をH2/H3形式で10個。対象は初心者の国内一人旅。見出しは20字以内。」 |
悪い例

良い例

ポイント
- 「誰のためか」「形式」「条件」を加える
- 曖昧さをなくすだけで精度が安定する
長すぎる出力と簡潔な出力の違い
長文すぎる回答は読み手にとって負担です。文字数や形式を指定すると、コンパクトで扱いやすい出力に変わります。
指示例
| 悪い例 | 良い例 |
|---|---|
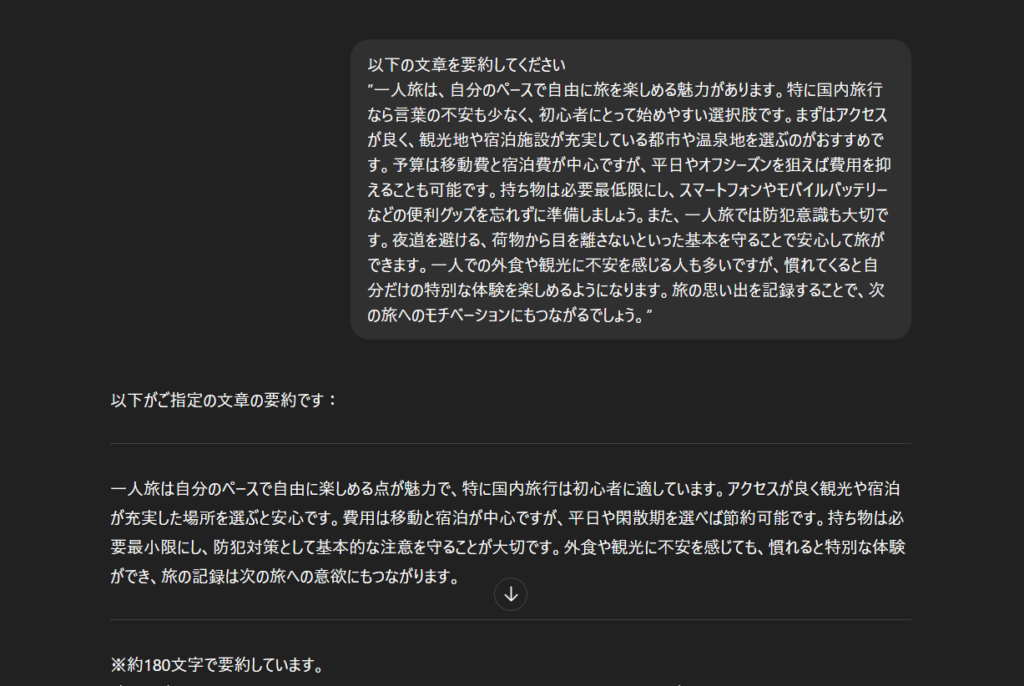
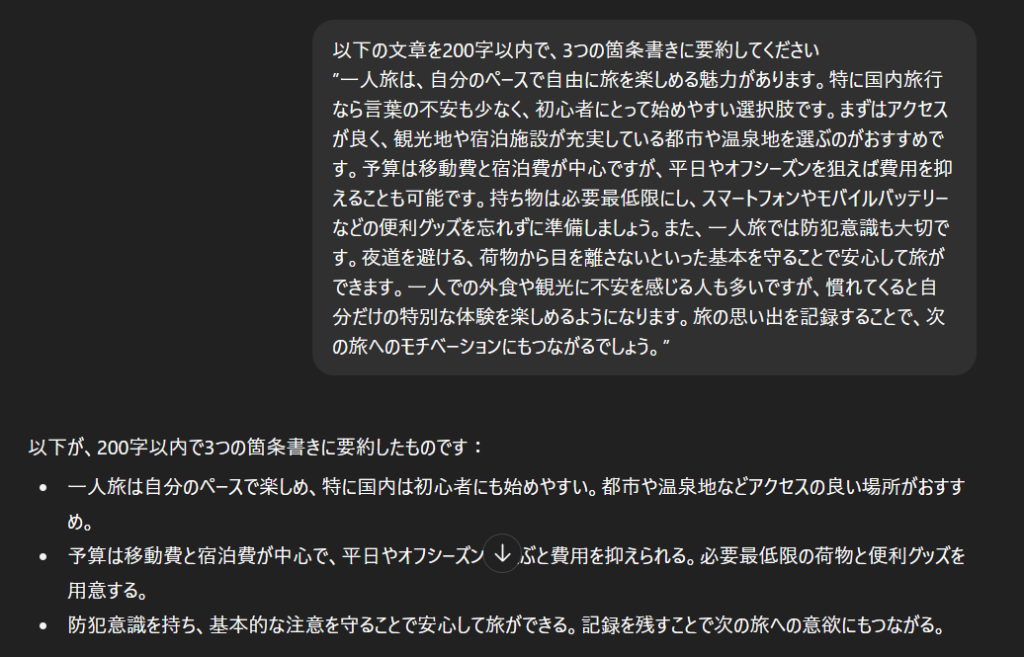
| 「この文章を要約して」 | 「この文章を200字以内で、3つの箇条書きに要約してください」 |
悪い例

良い例

ポイント
- 文字数や形式を明確にする
- 「簡潔さ」を基準に伝えると無駄を省ける
根拠がない回答と確認できる回答の違い
根拠を伴わない回答は信頼性に欠けます。出典や確認方法を指定すると、信頼できる内容に近づきます。
指示例(比較表)
| 悪い例 | 良い例 |
|---|---|
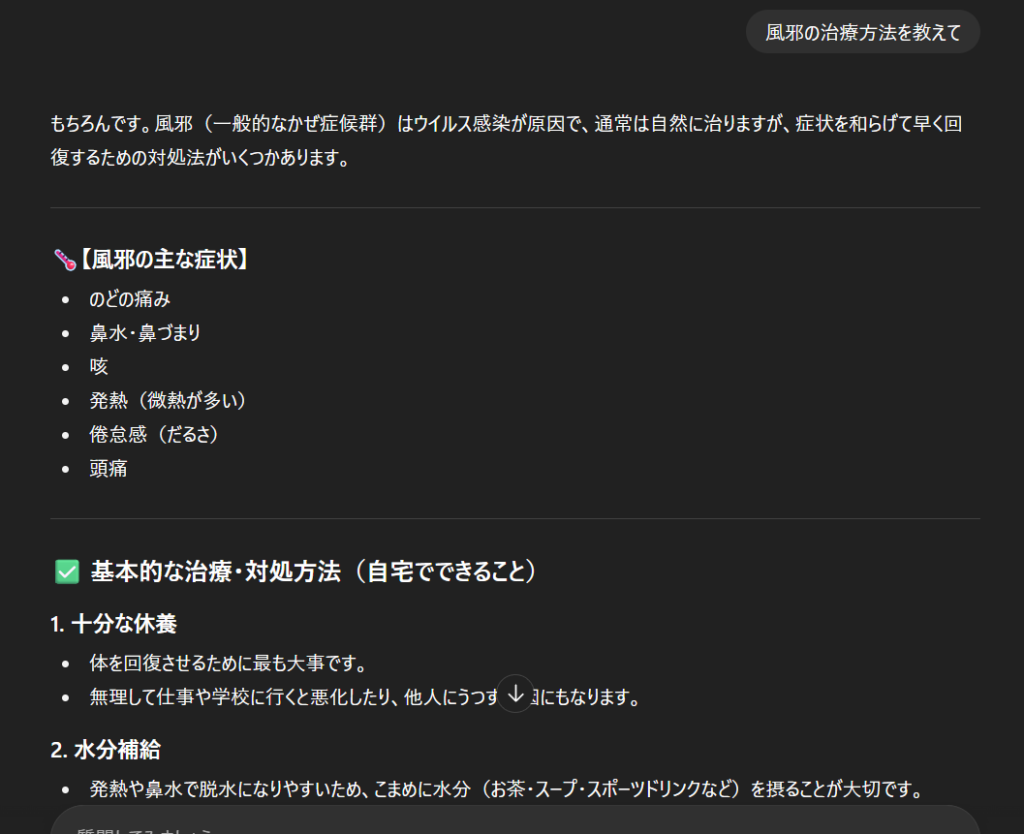
| 「この病気の治療法を教えて」 | 「この病気の治療法を、厚生労働省など公的機関の情報を基に簡潔にまとめてください」 |
悪い例

良い例

ポイント
- 出典や根拠を求める指示を入れる
- 回答の信頼性が大きく向上する
ChatGPTの出力の質を高めて詳細な回答を得る3つのコツ
基本的な使い方に慣れたら、さらに精度を上げる工夫を取り入れることが大切です。
ここでは、ChatGPTの使い方のコツとして、回答の質を高める3つの視点を紹介します。これを意識すれば、汎用的な説明から一歩進んだ「自分に最適な答え」に近づけます。
禁止事項や条件を入れる工夫
出力の質をコントロールするには「条件」と「禁止事項」を明確に伝えるのが効果的です。これらを指定しないと、ChatGPTは包括的に説明しようとして回答が長くなりすぎたり、専門用語が増えてしまったりします。
逆に条件を設定すれば、読み手に合った答えを引き出すことができます。
活用例
- 文字数指定:「300字以内で」
- 禁止事項:「専門用語を使わずに」
- 優先順位:「簡潔さを優先して」
たとえば「健康法を教えて」とだけ伝えると、曖昧で冗長な答えが返ってきます。しかし「健康法を3つ、初心者向けに200字以内で。専門用語は避け、日常で実行できる内容に」と指示すれば、読みやすく実用的なアドバイスが得られます。
ポイント
- 条件を明確にするとブレが減る
- 禁止事項を添えると回答の質が安定する
根拠確認や事実検証のポイント
最後に欠かせないのが「根拠確認」です。
ChatGPTの回答は便利でスピーディーですが、必ずしも正確とは限りません。とくに数値や法律、医療情報のように正確さが求められる分野では、根拠や出典を確認することが特に重要です。
たとえば「この法律を説明して」と聞くだけでは概要が一般的になり、信頼性の低い内容が混じる可能性があります。
しかし「この法律の概要を、法務省の公式情報を参考に300字で説明してください」と依頼すれば、出典を参照した内容に近づき、後からの検証も容易になります。
より信頼性の高い回答を得るためのチェックリスト
- 出典や根拠を指定する
- 固有名詞や数値は必ず確認する
- 公的機関や一次情報で裏付けを取る
用途別に最適化されたGPTsを利用する
さらに一歩進んだ使い方として「GPTs」を活用するのも効果的です。GPTsは特定の用途に特化したカスタム版ChatGPTで、たとえば「学習支援用」や「資料作成用」といった形で用意されています。
これらを利用すれば、汎用的な回答ではなく、より目的に即した出力を短時間で得られるため、効率化の大きな助けになります。

このように、カテゴリから探したり、検索したりすることで用途に最適なものを見つけられます。
安心してChatGPTを使うためのコツ
ChatGPTは便利な一方で、使い方を誤るとプライバシーやセキュリティのリスクにつながる可能性があります。特にビジネスや学習で利用する場合、情報管理の意識を欠かすことはできません。ここでは、ChatGPTの使い方のコツの中でも「安全に利用するための注意点」を3つに絞って解説します。
個人情報や機密情報を入力しない
もっとも重要なのは「入力する内容を選ぶこと」です。ChatGPTに入力した情報は、サービス提供者のサーバーを経由するため、個人情報や社内機密を不用意に入力する場合の漏洩リスクも考えなければなりません。
注意すべき情報の例
- 氏名、住所、電話番号、メールアドレス
- 社内の売上データや顧客リスト
- 契約書の原文や未公開の資料
安全に使うためには、固有名詞を伏せたり、データを仮の数字に置き換えるなど工夫が必要です。
公開データとの使い分け
ChatGPTは公開情報をもとに文章を生成します。そのため、社内限定資料や未公開情報を扱う場面では適切ではありません。逆に、公開されている統計や一般的な知識を要約・整理させる用途には大いに役立ちます。
安全な利用シーン例
- 公開されているニュース記事の要約
- 学習用の知識整理
- アイデア出しや文章の表現改善
避けたい利用シーン例
- 社内の極秘プロジェクトの要約
- 個人の履歴書や契約書の添削
- 顧客データをそのまま入力
「何を入力してよいか」「何を避けるべきか」を意識することが、安全利用の第一歩です。
チームや家族で活用するための共有のコツ
ChatGPTは一人で使うだけでなく、チームや家族など複数人で共有するとさらに便利になります。誰か一人が工夫したプロンプトや知見を共有することで、他の人も同じように再現性の高い結果を得られるようになります。
ここでは、ChatGPTの使い方のコツとして「共有の仕組みづくり」に役立つ方法を紹介します。
プロンプト例を共有する
効果的なプロンプトは、チームや家族で共有するだけで作業効率が大きく変わります。たとえば「メール文を短くする」「要約を200字以内にまとめる」といったプロンプトは、一度作れば誰でも使えます。
共有の方法例
- GoogleドキュメントやNotionにまとめる
- SlackやLINEグループに貼り付ける
- Excelやスプレッドシートに用途別に整理する
こうした「すぐ使える雛形集」を作れば、誰でも同じ品質の回答を得られます。
ノウハウを記録して標準化する
使い方の工夫や改善点を記録し、チーム全体で標準化すると成果のばらつきが減ります。
「どんな指示をしたら良かったか」「失敗したのはどんなときか」を書き留めることが大切です。
標準化のステップ
- 成功したプロンプトを蓄積する
- 改善のポイントを簡潔に追記する
- 定期的に見直し、不要なものは削除する
この流れを繰り返すことで、社内マニュアルや家庭での「使い方ノウハウ」の内容が充実していきます。
勉強会や教育に活かす
共有したノウハウを勉強会や教育の場で使うのも効果的です。特にチームでChatGPTを初めて利用する人には、実際の操作を見せながら説明すると理解が深まります。
活用シーンの例
- 社内研修で「プロンプト改善のコツ」を共有
- 学校や塾で、要約や暗記に使う方法を紹介
- 家族で旅行計画や買い物リストを作る体験を共有
こうした学びの場で実践的に触れることで、ChatGPTが単なる便利ツールではなく「共通の思考パートナー」としての価値を高められます。
まとめ: 使い方のコツを身につけて安心してChatGPTを活用しよう
この記事をまとめると、
- ChatGPTの使い方のコツは「考える→シンプルに始める→形式を指定→再質問→検証」という基本5ステップ
- 日常生活・学習・仕事といった場面ごとに指示を工夫すれば、実用的で役立つ回答が得られる
- 条件を明確にすることで精度が大幅に上がる
- 出力の質を高めるには「前提や目的」「条件や禁止事項」「根拠確認」の3つが重要
- 安心して使うためには、個人情報や機密情報を入力せず、公開情報と非公開情報を切り分け、必ず裏付けを取る
- チームや家族でプロンプトやノウハウを共有すると、誰でも同じように成果を再現できる
でした。
ChatGPTの使い方のコツを身につければ、日常からビジネスまで安心して活用できます。今日から一つでも試し、自分に合った方法を取り入れてみてください。


